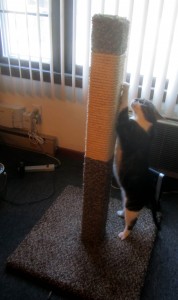
I needed a scratching post to save my door frames from my cat’s claws, but I wanted to make one rather than buy one because all the store scratching posts were expensive and the wrong height for my cat (far too short).
Based on the scratch marks on my door frames, my cat usually scratches between 22″ and 37″ off the ground (a 15″ span). I wanted the post to be a few inches higher than the scratching area, so I made a 41″ high post with carpet from the bottom up to 22″, sisal rope from 22″ to 37″, then more carpet from 37″ to the top at 41″.
I was lucky in many ways with this project. For example, the longest length of sisal rope at Lowes was 50′, which (at 3/8″ thickness, wrapped around a 3.5″ wide square post) just covered the needed 15″ span.
I was also lucky that the 2′ x 2′ plywood base at Lowes was exactly the right width; it was recommended that the base’s sides be at least 60% of the height of the post, so a 40″ high post needs a 24″ square base.
The two main resources I used in making my post were:
- How to Build a Scratching Post – a how-to video worth watching, most helpful for doing the base
- Build Cat Scratch Posts with Sisal Rope – most useful for its list of materials and notes on using them
The materials I used in this project were:
- 4′ x 4′ x 8′ fir wood (i.e., an 8 foot long “4 by 4”) – $10.12
- 2′ x 2′ x 23/32″ pine base – $8.68
- 3/8″ x 50′ sisal rope – $8.78
- Carpet remnant – $13.14 for a 2’10” wide by 12′ long piece; remnant dimensions vary, but width must be at least 30″ because the carpet to cover the base is 30″ x 30″; one page said not to get Berber or industrial, to get plush or cut pile instead (mine was cut pile), another said thicker pile is better because cats will tear up a shorter pile
- 9/16″ staples for attaching carpet and rope ends to post – $3.38
- Spray adhesive (highest adhesion) for holding carpet and rope to base/post – $9.98; you can also use double-sided carpet tape instead ($4.67) as shown in the How to Build a Scratching Post video
- Long lag bolt for attaching post to base (Lowes item #69525) – $0.73
- Washer for lag bolt, for between bolt head and base (Lowes item #68882) – $0.12
- Extra long (6″ length) 3/16″ drill bit to make hole long enough in post for lag bolt – $3.94
This brought my total cost for one post to $63.54, but because I could get two 41″ sections out of one 8′ long 4×4, to make a second post all I needed to buy again was the sisal rope, pine base, lag bolt, and washer, making my overall cost for two posts $81.85, or $40.93 per post, which I thought was a pretty good deal for such a big scratching post.
I used the following tools, which I already owned:
- Measuring tape for various measurements
- Staple gun to staple carpet to post
- Utility knife to cut carpet
- 4′ level for leveling post and drawing diagonals on base to find its center
- Power drill with built-in level; this is the basic Lowes Ryobi drill
- Drill bit slightly larger than the lag bolt for making hole in post base, which lag bolt passes through
- Sharpie for making marks on wood and carpet backing
- Chop saw for cutting the 4×4 into two posts
- Socket wrench or adjustable wrench for final tightening of lag bolt
Here’s what I did…
Cut the Post and Drill Lag Bolt Hole
Use the chop saw to cut the 4×4 into two 41″ sections; discard the small 14″ leftover unless you have another use for it. From this point forward, I assume you’re just working with one of the 41″ posts.
Place the post horizontally on a table or work bench, then put the level on top of it to see if it’s level. If necessary, use scrap paper under one end of the post to adjust until it’s level.
Use the sharpie to make a corner-to-corner “X” on the end that you previously identified as the bottom (i.e., that you started measuring the 22″ mark from); the center of the X is the post’s center.
Load the extra long drill bit into the drill and make sure the drill is level using the built-in level on top of the drill. Then drill the full length of the extra long drill bit into the post, all the while watching the level in the drill to ensure you’re drilling level.
Top of Post
If you’re using double-sided carpet tape, attach it on all four sides of the post, and the post’s top, but don’t peel off the outer-facing paper yet.
Mark lines around the post at 22″ and 37″ from the bottom (i.e., 4″ from the top).
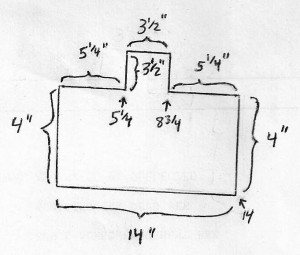
Mark the following design on the back of the carpet remnant and then cut it out with the utility knife. (Note: The reason the dimensions on the top piece are only 3 1/2″ are because a “4 by 4” is only “nominally” 4 inches, and is actually 3.5″.)
If using spray adhesive, spray all four sides of the top section (the top 4″), and the top itself. (Remember, with spray adhesive you usually wait a few minutes for it to get tacky before applying anything.) If using carpet tape, use the utility knife to make a cut all around at the 4″ from the top mark, then peel the backing off the four sides and the top, so it’s sticky.
Carefully attach the carpet that was just cut to the post, starting with the top square, then folding it down onto the post and around. This makes the carpet ends meet halfway on a side, making it easy to staple them to the post.
Staple the two carpet ends that meet on the post, up and down both their edges. Also staple the top square onto post’s top on all four sides (near the edges).
Middle of Post
Use spray adhesive on the middle of the post (between the two marks), or if using carpet tape, make a cut around at the 22″ mark and remove the backing paper to leave it sticky.
Pick a corner at the top of the now-sticky middle area, and run the sisal rope from corner to corner on one side, right up against the carpet. Staple the beginning of the rope to the post once or twice.
Carefully and tightly wrap the rope around each side, going around and around the post, trying to keep it as tightly pressed against the post and the previous wrapping line as possible. Do this until you run out of rope, then staple the end of it to the post once or twice. (Note: This is the most grueling part of the whole post-making process.)
Bottom of Post
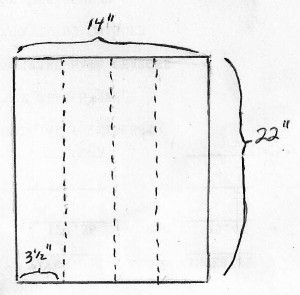
Measure from the end of the rope to the bottom of the post, to get the height for the next carpet cut. (The following diagram shows a 22″ height, but it may be more or less than 22″ depending on your rope wrapping skills, length of rope, etc.)
Mark a rectangle on the carpet backing with a 14″ width and a height equal to the measurement just taken (22″ in this diagram), then cut it out with the utility knife.
Use the sharpie to make marks on the top of the just-cut carpet at 5 1/4″ and 8 3/4″
(The dashes aren’t cuts, they’re just showing where to fold in the next step–again, the reason it’s 14″ is that a 4×4 post is actually 3.5″ x 3.5″, so 3.5″ x 4 sides = 14″.)
Use spray adhesive on the post from its bottom up to the end of the rope, or if using carpet tape, remove the remaining paper backing to make it sticky.
Carefully apply the carpet to one side of the post so that the post fits neatly between the two marks previously made at 5 1/4″ and 8 3/4″; this ensures that as you wrap the rest of the carpet around the post, the two ends meet midway on the far side.
Wrap the rest of the carpet around the bottom of the post, then staple up and down the two carpet edges to ensure it stays put.
(This stapling is optional and you may omit it if you think your cat will often scratch the lower part of the post, since you don’t want your cat’s paws getting caught on staples; I did it anyway because I knew my cat would only be scratching the area from 22″ to 37″.)
This completes the post itself.
Base of Post
Take the 2′ x 2′ plywood base and use the 4′ level and sharpie to mark two corner-to-corner diagonal lines (making an X); where they cross indicates the base’s center.
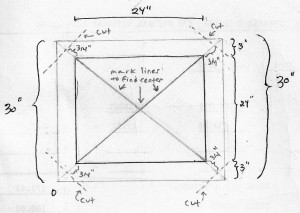
Cut a 30″ x 30″ square out of the carpet using the utility knife:
(The picture shows both the 30″ x 30″ carpet and the 2′ x 2′ base that will fit in its center.)
Use the level to mark a corner-to-corner X on the carpet backing too.
Use spray adhesive (or many rows of double-sided carpet tape) to completely cover the side of the base that does not have the “X” on it, then (after waiting a bit if using spray adhesive) lower the sticky side of the base onto the carpet backing, lining up their respective “X” marks to center the base in the carpet square.
About 3/4″ out from each corner of the base, make a diagonal cut—see dotted lines in the picture; do this for all four corners.
Use spray adhesive or double-sided carpet tape to make a 3″ wide area on each side of the base sticky, then wrap the carpet inward onto the sticky area on all four sides.
Use the drill bit which us slightly wider than the lag bolt to drill through the base center (the center of the “X”) and through the carpet on the other side.
This completes the base, and makes it ready for attaching to the post.
Attaching the Base to the Post
Place the post on the floor, upside down (hole side up), then place the base on top of it, upside down (X side up) as well.
Put the washer over the hole in the base, then push the lag bolt through the washer and base hole, and into the hole in the post itself.
Gently hand-tighten the lag bolt a bit to get it started, then as it becomes more difficult to turn, switch to the socket wrench or adjustable wrench—but don’t completely tighten it all the way to the base yet.
Make sure that the base is square to the post itself (that the base’s sides are parallel to the sides of the post, so it’s square on square), and then carefully finish completely tightening the lag bolt against the washer and base.
Turn over the post/base combination so the bottom of the base is on the floor, and you’re done!
Notes
There are various ways to attach the post to the base. For example, the video uses 5 wood screws, and I’m sure drywall screws would work just as well. I was told that a single long lag bolt and washer would fasten the base to the post very well though, so that’s what I used.
A friend had also suggested using two 2x4s instead of a single 4×4, as he said 2x4s are much cheaper that a 4×4, but then you have to fasten the two 2x4s together and it also makes attaching the post to the base a little more complicated (you can’t use a lag bolt or center screw). Since the 4×4 was only $10 I decided to make life simple and just use that.
Some ways to cut the cost down might be:
- Get a left-over 41″ 4×4 from someone instead of buying a new 8′ piece (or combine two 2x4s as mentioned above)
- Use double-sided carpet tape instead of spray adhesive
- Use wire nails to attach the sisal to the post instead of staples, if you already have wire nails on hand
- Use any carpet segment you already have, instead of buying a carpet remnant
- Use wood screws or drywall screws to attach base to post, instead of the lag bolt and washer; this also means you probably won’t have to pre-drill a hole into the base
I wouldn’t recommend using a different, cheaper form of rope, as a lot of the websites I found indicated that sisal rope is really the best for a cat scratching post, and other types of rope just aren’t as good for cats’ claws and/or aren’t as appealing to cats.


And we must know how to teach cat to use a scratching post. It takes our patience. Btw. Nice post…. 🙂